Author: Calvin Russell

How Long Does It Take to Get Solar Panels Installed?

The process of getting Montana Solar panels installed can take anywhere from a few weeks to a few months. It all depends on what type of system you need, how long it takes to secure the necessary permits, and how quickly your solar provider can get everything started.

Solar Panels

A reputable installer will help you select your solar solution and manage the paperwork involved. They will also provide warranties to protect your investment.

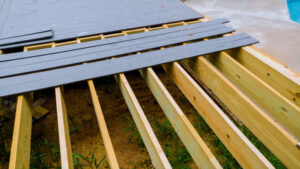
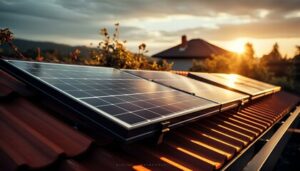
Roof-mounted solar systems are a popular choice for residential power generation. These systems can reduce or eliminate utility bills and reduce your dependence on the electric grid. They also provide a way to offset your carbon footprint and move away from fossil fuels. In addition, they allow you to sell excess electricity back to the local utility company.

There are a few different roof-mounted solar mounting options, including railed and pole mounts. Railed solar systems attach to the roof with rails and a series of clamps that connect each panel to the rails. This allows for a more flexible design that can accommodate the roof’s unique structure and shape. Depending on your home’s electricity needs and location, you may want to consider adding an auxiliary inverter to further maximize energy production.

Pole mounts are another option that can be attached to the ground with a base or a foundation. They can be designed to accommodate a variety of sub-structure types, such as carports or pergolas. They can be positioned to produce energy in the most efficient direction and to maximize sunlight exposure. They can also be installed with a single- or dual-axis tracking system that follows the sun throughout the day to capture more energy.

When choosing a solar system, be sure to choose a manufacturer that provides quality components and comprehensive technical support. IronRidge, for example, has been designing and manufacturing structural hardware for over a quarter of a century. Their products are designed to be strong, lightweight, and cost-effective. They are also rigorously tested to meet industry standards and requirements.

It is also important to have a professional inspect the solar array regularly for any damage or potential problems. This will help to ensure that all fasteners are tightened and that the seals are in good condition. In addition, it is a good idea to have regular cleaning of the solar panels and the roof area. Keeping the site clean and free of debris can prolong the lifespan of the solar system and prevent the need for costly repairs or replacement.

Ground Mounting

Ground mount solar systems, as the name suggests, are designed to sit on the ground rather than on top of a home. They’re ideal for commercial spaces or open plots of land, where they can take full advantage of sunlight. They’re also easier to access than rooftop solar arrays, making them a better choice for homeowners who want to play an active role in maintaining their system (i.e. cleaning snow or debris off the panels).

There are two main types of ground-mounted solar systems: standard ground mounts and pole-mount systems. Standard ground mounts use metal framing anchored into the ground to hold solar panels at a fixed angle. Many of these systems are oriented due South to maximize energy production. Pole-mount systems, on the other hand, offer more flexibility in positioning panels. These systems can be positioned on various terrains and are usually supported by one or more tall poles. Most pole-mount systems feature a single or dual-axis tracking system that automatically adjusts the panels’ position to follow the sun throughout the day.

The cost of a ground-mounted solar system can vary depending on the size and location of your property. Larger ground-mounted systems may require extensive site preparation, such as clearing the surrounding area of vegetation and rocks to allow for proper installation. In addition, the cost of a ground-mounted system will likely be higher than a roof-mounted system, due to longer wiring runs that can cause significant voltage drop over long distances.

While the upfront costs of a ground-mounted system are higher than a roof-mounted system, they may offer greater savings over the long run. This is especially true for those who live in rural or remote areas, where local utilities often charge significantly more for electricity than those in larger cities.

As with all energy-generating systems, regular maintenance is essential to keeping your solar array at peak performance. Luckily, there are many easy ways to keep your solar array clean and running smoothly. The best way to ensure your ground-mounted solar panel installation is performing as well as possible is to hire an experienced installer. Nuance Energy offers cutting-edge solutions to help you accelerate your solar installation projects.

Battery Storage

Battery storage solar installations offer a unique solution for homeowners who want to maximize the benefits of their solar energy systems. A home battery can provide cost-saving electricity during peak demand periods, and it can also serve as backup power during outages. Battery storage can be installed alone or with a solar panel system.

Battery systems are often used to take advantage of low utility rates, such as those that occur during the night or on weekends. This is known as ‘peak shaving’ and ‘energy arbitrage’, and it can significantly reduce electricity costs. A battery can also be utilized to offset the cost of a solar system, especially in areas with high utility rates or time-of-use pricing.

Home battery storage can also be used for grid services, including providing ancillary functions like frequency regulation and voltage control to the grid. This can help utilities increase the share of renewable energy while maintaining a reliable power supply to their customers.

While battery storage isn’t right for every homeowner, it offers some compelling benefits in New York, where expensive time-of-use electricity and frequent outages can be costly. A battery can keep critical loads like refrigerators running during a power outage, and it can be combined with a solar array to create an integrated system that’s self-sufficient. Additionally, homeowners can earn cash rewards from PSEG Long Island by deploying a grid-tied battery configured for solar self-consumption under their Battery Rewards program.

There are many reasons to consider a battery storage solar installation, but the best way to determine your needs is to contact a professional installer and have them assess your site. They can design a system that meets your energy goals, and they’ll recommend the right type and size of batteries for your needs.

A battery system is most often powered by lithium-ion technology, which is also found in electric vehicles and laptops. For the most efficient use of your solar energy, a battery should be located within close proximity to your solar panels and inverter. Once the solar battery is installed, it will be connected to a monitoring system that ensures all components are working as expected.

Inverter

Solar inverters are the backbone of your solar energy system. They convert DC electricity from your solar panels into AC electricity that is used by appliances and the grid. There are several different types of solar inverters including microinverters, power optimizers or string inverters. Your installer will recommend the best type of solar inverter for your system based on your property conditions and energy needs.

Inverters are connected to solar panels using DC cables. Sunlight energizes electrons in the solar cells, creating a direct current that is sent to your inverter through the cable. Your inverter converts this DC current into usable AC electricity and ensures that voltage fluctuations between panels connected together are stabilized. It is also where the energy generated from your solar panels and battery is transferred to the utility grid.

The inverter can also be integrated into a solar energy storage system to enable you to store your excess solar energy for use at night or during utility power outages. This is known as a hybrid inverter system.

It is important to place your solar inverter in an environment that is free from heat, excessive dust and moisture. If it is not placed in a safe location, your solar inverter could overheat and damage the system. It is also important that your inverter has proper ventilation.

One of the most common mistakes made during solar inverter installation is failing to properly ground your system. This step is essential for preventing electric shocks and other electrical hazards.

Your inverter can be connected to your home’s electricity supply through either a single-phase or three-phase connection. Single-phase connections use 3 wires to provide mains electricity, while three-phase supplies use 5 wires. If you are connecting your solar inverter to a grid-connected system, your installer will also install a dual meter. This is necessary to record the amount of electricity you are producing and consuming at your home.

Choosing the right solar inverter for your system is important for long-term energy production and savings. There are many specific features that impact this decision, such as the complexity of your roof and whether it is prone to shading or variable sunlight conditions. Premium microinverters offer better performance for systems with these challenges and can maximize energy production in comparison to string inverter-based systems.

The Benefits of Basement Remodeling

Basement Remodeling Fulshear TX is a great way to increase the value of your home, create more functional space and even save on energy costs. The return on investment is one of the highest for any home improvement project.

Basement Remodeling

Finishing the basement involves insulating, drywalling, painting and extending electricity and your HVAC system to the space.

A basement remodel can increase your home’s value by adding livable space and making it more functional. A few key factors can affect the final cost of your project. It is essential to set a budget and work within it. Keeping an eye on costs throughout the process can save you money by preventing unexpected expenses and revisions to your design.

A budget-friendly approach is to use existing materials and features as much as possible. This reduces the need for additional walls and wiring, cutting labor costs. Choosing affordable flooring options like vinyl or LVP can also be a great way to keep costs down.

In order to create a comfortable environment, the basement must be properly insulated. This prevents heat loss and cold air infiltration, lowering energy costs and making the space more comfortable. In many cases, basement insulation is more expensive than other parts of the house, but the long-term savings outweigh the initial investment.

New plumbing is needed for basement bathrooms, wet bars, laundry rooms, and other alterations. In addition, water and drain lines may need to be rerouted. This can add up quickly and significantly to the overall costs of the project.

If you’re reworking the existing layout, make sure to carefully inspect the space for structural issues that can cause costly repairs down the road. A professional inspection will identify any potential problems and allow you to address them early in the renovation process.

Floating room dividers and curtains can help you designate different areas without solid walls, reducing the need for framing and electrical costs. It’s also a good idea to keep your eyes open for any signs of mold or water damage that can be repaired before they turn into major issues.

Hiring professionals to complete complicated jobs like plumbing and electric can reduce the total cost of your basement remodel by up to 10%. It’s important to choose professionals who are experienced with basement finishing and know how to work efficiently. Alternatively, homeowners can take on some simple DIY tasks like painting and floor installation to cut labor costs.

Layout

Basements are often neglected spaces, but with the right design, they can become an essential part of the home. Whether used as a family room, home theater, or game zone, this area can add value to the house and provide space for the entire family to gather together. Creating a basement floor plan with multiple zones allows for flexibility and adaptability as the family’s needs change. Use movable partitions to create privacy without sacrificing open space, and incorporate storage solutions that minimize clutter and maximize vertical space.

For a home entertainment system or movie room, it is important to consider the size of the screen and seating arrangements to ensure a comfortable viewing experience. Similarly, a game zone requires enough space for the table and accessories. A ping-pong or pool table will require at least 5 ft on each side, while a foosball or air hockey table will need 3-4 ft on each side. The space also needs adequate lighting to illuminate the room and make playing games fun.

A bar or wine cellar is another popular feature that can add value and functionality to the basement. Depending on the design, the bar may include counters or a built-in bar to allow for easy preparation of drinks and snacks. It is also a great place to store bottles of wine or other alcohol, and can be used as a gathering spot for friends and family members.

If a bedroom is included in the basement floor plan, it is important to have an egress window to comply with safety regulations. This window should be located near the main living areas to ensure that it is easily accessible in the event of an emergency. It is also helpful to have a closet adjacent to the window for extra storage.

To design a basement layout, it is important to understand the client’s goals and vision for the space. For example, if the client wants to have a cozy charm in the space, it is important to incorporate warm colors and cozy fabrics. On the other hand, if the client plans to turn the space into a modern media room, it is crucial to use neutral colors and clean lines.

Design

Gone are the days when basements were relegated to utility rooms and storage areas. Today, homeowners are embracing their basement remodeling potential and transforming them into stylish, multifunctional spaces that integrate beautifully with the rest of the home. With careful planning and smart design choices, a basement can become anything you want it to be—a workout room, a game lounge, a guest bedroom, a media room, or even a kitchenette.

Start by thoroughly inspecting the space. Look for any signs of moisture or structural issues, and address them before you begin your renovation. Next, determine how the space will be used and measure for ceiling height to ensure it meets building codes and is comfortable for occupants.

If you’re using the space as a bedroom, be sure to include an egress window to comply with safety regulations. You’ll also need to consider how natural light will be incorporated into the space, as basements are often dark and damp. Consider implementing skylights or enlarged windows, as well as recessed lighting and accent fixtures.

If your basement has a lot of fixed features, such as support columns, it’s important to think about their effect on the layout and design. If you can’t move these items, try boxing them in or planning walls around them so they become part of the room’s décor. You can also add decorative moldings to help hide or complement existing features.

A basement is the perfect place to create a second family room, especially for families with young children who may be overwhelmed by the clutter and noise of a main floor family room. Create a space that’s both relaxing and fun with plenty of comfortable seating, a large screen TV or projector, and custom storage for games, toys, and media.

If you’re thinking about incorporating a home gym into your basement remodel, be sure to plan for equipment like treadmills, weights, and exercise bikes. It’s also a good idea to include ample storage for workout clothes and other gear. Finally, make the area as appealing as possible to attract and retain users by adding a comfortable lounge chair or ottoman, colorful accent furniture, and attractive flooring options.

Contractors

A well-executed Basement Remodeling project adds value to your home and enhances its comfort, usability, and efficiency. It also increases the number of living areas in your home and expands your family’s personal space. Whether you want to turn your basement into a home gym, theater, guest suite, children’s playroom, or man-cave, the right contractor can bring your ideas to life. A qualified contractor will work closely with you to develop a budget, layout, and design for the space. They will also offer creative solutions to fit your specific needs and budget.

The first step in Basement Remodeling is a thorough inspection to assess the condition of the space and note any existing features that will influence your renovation plans. This includes checking ceiling height to ensure it meets building codes. In addition, contractors should address any structural or water damage issues before starting the renovation. Depending on the scope of the project, basement remodeling may require electrical or plumbing changes that could increase costs.

Basement remodels that involve transforming the space into a bedroom or bathroom often require installing egress windows, which can be challenging to do in concrete walls. These projects also require modifying the plumbing and electrical systems, which may require cutting and trenching in the foundation or a small-scale excavation. These types of renovations should be done by experienced professionals who have the proper tools and knowledge to do the job safely and efficiently.

In addition to addressing any safety issues, basement remodeling will likely include installing new lighting fixtures. This is especially important for a basement, where natural light is limited. Contractors will recommend recessed lighting that is energy efficient and provides ample light for the space. They will also install dimmer switches to control lighting levels.

Having a basement remodel expert oversee the project will help ensure that all aspects of the renovation are done correctly and according to code. This will protect the integrity of the structure and minimize costly surprises down the road. It’s important to hire a contractor who has experience working on basement renovations and can provide references from previous clients. Other important factors to consider when choosing a contractor include licensing, insurance, and a proven track record.

How to Reduce the Cost of Deck Repair

Whether you’re doing cosmetic repairs or a serious structural repair, it’s important to hire professionals. However, negotiating terms and shopping for contractor discounts can help reduce the cost of deck repair.

Deck Repair

Deck repair is a matter of safety, and simple timely repairs can prevent more costly problems in the future. Fortunately, most home owners can handle minor maintenance tasks like securing loose railings and staining their decks. Visit Website to learn more.

A deck that’s been damaged by storm or normal wear and tear needs repair as soon as possible. In the case of a wooden deck, this means addressing issues like loose boards and rotted wood. Depending on the extent of damage, you might need to replace some or all of the affected boards.

Loose boards are an immediate safety hazard for anyone walking on the deck, leading to fractures and sprains. They can also cause long-term structural damage as they shift and compress joists. In addition, loose boards allow moisture to infiltrate the structure, which can lead to mildew and wood rot.

One of the easiest ways to determine whether a board is rotting is to look for signs of water damage. Some discoloration and weathering is natural over time, but excessive deterioration indicates that the board needs to be replaced.

Another common sign of damage is a spongy feel to the board. This could indicate that the foam core has degraded and exposed a softer layer. This can be a serious problem and should be addressed as quickly as possible to prevent further degradation of the board.

Other signs of damage include cracks in the fiberglass shell and dings that expose the foam. These can be a result of damage from heavy surfers or other activity on the deck. In most cases, these dings can be repaired using fiberglass resin and epoxy to reconnect the damaged layers.

When it comes to particle board, damage can also occur when the boards are glued together. Epoxy is the best glue to use for this purpose as it bonds well with both sides of the board. This type of glue is also good for joining boards that have developed a small crack.

Before attempting to repair a crack, you’ll need to ensure that the board is completely dry. Moisture can cause the board to swell or warp, making it difficult to repair. Using a hairdryer and fans to speed up the drying process can help. Once the surface is dry, sand the affected area with medium-grit sandpaper to prepare it for repairs.

Water Damage

Over time, sun and rain take their toll on wooden decks. When wood becomes splintered, flaking, cracking or exhibiting other signs of damage, it’s time to look into deck repair options. Often, wood needs to be replaced before it starts breaking down further and posing safety risks for anyone walking on the surface.

Water damage from moisture infiltration is another common deck problem. It is possible to protect against this by applying a stain and/or sealant that offers waterproofing properties. But if these protective treatments fail, moisture can seep into the wood and attract a fungus that leads to wood rot. Fungus spores grow well in warm areas rich with moisture, and the rotting wood can eventually weaken or even disintegrate, creating a dangerously slick spot.

Moisture can also lead to a condition known as heaving, which causes portions of the deck to rise and fall like ice floating in a drink. This happens when footings, the concrete pads that support a deck’s posts, aren’t installed below the frost line, as required by building codes in colder regions. If the heaving is severe, it can pull up or even collapse your entire deck.

Termite infestations and insect damage can wreak havoc on a deck. If you notice piles of 1-2-inch insect wings or frass (termite droppings that resemble sawdust), it’s time to contact a local exterminator for help.

Loose railings can also be a serious safety hazard, especially for elderly or disabled persons. A loose railing may fall or get tangled up in a person’s clothing, leading to serious injury. A professional can determine the source of a loose railing and either fix or replace it, as needed.

Nails and screws corrode over time, which can make parts of a deck come loose or fall off completely. Regularly checking for corroded hardware is an easy, inexpensive part of a homeowner’s maintenance routine that can help prevent the need to complete costly deck repairs. Loose nails or screws should be replaced as soon as they’re spotted to avoid potential injury for anyone using the deck.

Loose Railings

Metal railings are a great safety feature on decks, but they can loosen over time. Loose metal railings can be dangerous, especially for children and elderly people. The best way to prevent loose porch railings is by performing regular maintenance. The first step is to carefully inspect the railings and posts to determine what caused them to become loose. Then, you can choose the right repair method.

One common cause of loose wooden porch railings is weather. Prolonged exposure to sunlight can fade, warp, and dry out wood, causing it to weaken over time. Humidity and moisture can also lead to wood rot and hardware rust. Wind can dislodge or damage the connections between railings, and hailstorms can dent or weaken the hardware.

Whether the railings are made of wood or metal, the steps for repairing them are similar. Examine the connections to make sure the screws, bolts, or nails are tightened properly. If the railings still wobble, you may need to reinforce them. Try using metal brackets, wood blocks, or stiffeners specifically designed for your type of porch railing.

You may also need to re-tighten the carriage bolts or screws that hold the railings in place. Wood expands and contracts with the seasons, and continuous freeze-thaw cycles can cause the hardware to loosen over time. Periodically tightening the bolts or screws can eliminate wobbling in wooden railings, but it is essential to follow a routine maintenance schedule to prevent problems from returning.

Plastic or composite railings are less likely to become loose than wood, but they can still become loose over time. To fix a loose plastic or composite railing, first locate the specific area that’s loose. Then, inspect each individual board to make sure it’s level and properly aligned. Finally, use a ratchet or drill to tighten any hardware that’s loose.

Pests

The slightest spill or crumb of food on your deck can serve as an invitation to pests. Keeping your deck clean on a daily basis can drastically cut down on how often you need to deal with pests. Sweeping the wood and wiping down surfaces with a cleaner made from a quart of bleach and a gallon of water will help keep your deck free of insects like ants, carpenter bees, hornets, and powderpost beetles.

Pests are especially attracted to old wooden decks that have become damaged by moisture and rot. These insects will slowly eat away at the materials that hold your deck together, eventually leaving you with a structure in need of major repairs or replacement. It’s important to look for these issues early on so that you can treat the pest problem and prevent it from spreading further.

While you can keep an eye out for obvious signs of pest damage, some red flags may be harder to spot. For example, a termite infestation could appear to be wood rot until you probe the affected area. Luckily, a professional will be able to tell the difference between the two with ease.

Rodents also cause significant damage to wood decks and are a serious risk for homeowners. Signs of rodent activity include greasy trails left behind by scurrying rats or mice, as well as holes in the deck and the surrounding areas. Termite damage can be more difficult to spot, but it’s essential to have any suspected infestation inspected by a professional.

If you have a problem with pests, try using repellent sprays to deter them. However, this can be dangerous for pets and children, so it’s best to hire a pest control specialist who can humanely remove the pests from your property.

Other ways to keep pests away from your deck include putting up netting to cover it, as well as making sure all plants are kept trimmed and away from the deck itself. You can also install flashing lights to deter possums and raccoons from living under your deck, as well as special “bug lights” that emit low-level light frequencies that don’t attract bugs.

Hair Extensions – Adding Length, Volume and Thickness to Your Hair in Minutes

Hair Extensions San Francisco are like beauty shortcuts – they add length, volume and thickness to your hair in a flash. They are perfect for those who want to try new styles and create glamorous looks for special occasions.

Hair Extensions

To keep your extensions looking their best, always brush gently and start detangling at the ends. Limit the use of heat styling tools to prevent long-term damage.

Whether you’re looking to add length or volume, hair extensions can be used to transform your look in minutes. The right extension length can make your hair look full, healthy, and beautiful. But it’s important to know that not all extension lengths are created equal. The wrong length can make your hair look too heavy or unnatural. The best way to find the perfect length for your hair is to consult a professional stylist. They can assess your lifestyle, facial features, and hair texture to help you choose the right length.

The right hair extension length can also depend on the method of attachment. There are many different types of hair extensions, including tape-in, clip-in, weave, micro-link, and fusion extensions. It’s important to select a type of extension that will match the color and texture of your natural hair. This will prevent the extensions from sticking out or looking too contrasting.

For most types of hair extensions, it’s important to select a length that is slightly longer than your natural hair. This will ensure that the strands blend seamlessly and prevent any obvious demarcation lines. Typically, the best length for most women is around 4-6 inches longer than their natural hair.

Hair extension length can also depend on your face shape. For example, if you have a square face, you may want to opt for long extensions to add balance to your look. On the other hand, if you have a heart-shaped face, you might prefer to opt for medium-length extensions.

It’s also important to note that the type of hair extension you choose will also determine how much maintenance is required. For example, clip-in extensions can be easily removed and replaced each day, while fusion and sew-in extensions require a bit more care and attention. It’s also a good idea to use sulphate-free shampoo and conditioner when wearing hair extensions to avoid matting or tangling.

Hair extensions can be a great way to achieve luscious, full locks that you’ve always dreamed of. But before you reach for those extra inches, it’s important to consider your lifestyle, style goals, and hair maintenance commitment. It might be that less is more, and your style will thank you for it.

Volume

The term hair extensions often evokes images of flowing Rapunzel-like locks, but they are not just about adding length. They are also a great way to add density and volume to your hair if you have thin or flat locks.

Thin or short hair can make you feel self-conscious and insecure about your appearance, but with the help of extensions, you can achieve a fuller, luscious mane that will leave you feeling confident. There are many different types of extensions and methods that you can choose from, so it is important to find the right one for you.

Mal explained that she recommends Tape-In extensions to her clients who want to have a little more volume in their hair. This method is more durable and less damaging than other types of hair extensions as it uses waterproof, medical grade glue. In addition, the small piece of your natural hair that is sandwiched between the tape-ins matches the weight of the extension, which helps to prevent it from weighing down the hair and causing damage.

Another popular option for boosting your hair’s volume is the hand-tied wefts of hair. These are created with true virgin, raw (cuticle) hair, which means that the strands have not been processed or colored and have kept their integrity. The strands are then hand-tied to the client’s natural hair using a technique called “wefting” which creates a smooth, seamless blend that looks very natural.

Other methods that can help with both length and volume include the strand-by-strand technique, which involves attaching each individual strand of hair with a keratin bond or a micro bead. This allows you to create a more customized look, as each strand is placed where it is most needed. The strand-by-strand method can be a more expensive option, but it is also the most natural looking and durable.

Other types of extensions that can give you length and volume include clip-ins, which are fairly easy to put in and take out as often as you like. They can also be very affordable, but they do not last as long as other types of extensions. Another option is to use sew-in or bonded extensions, which are more permanent options that can be worn for months with proper care.

Thickness

Hair extensions come in a variety of thicknesses, and it is essential to choose the right one for your natural hair density and length. For example, if you have fine hair, thicker extensions will blend in seamlessly and look more natural than thin ones. However, if you have medium density hair, you can go with a range of thicknesses to achieve your desired look.

Thickness also determines how easy it is to style your hair. If you have short, straight hair, it will be difficult to create voluminous curls or chic updos. In this case, it’s best to opt for wavy or curly hair extensions that will naturally give you a full and beautiful head of hair.

Another important factor to consider is the weight of your hair extensions. While it is crucial to choose the right thickness for your hair, it’s equally important to make sure that the weight of the extension matches your natural hair volume and density. A poorly fitting set can cause your natural hair to thin and damage the roots, which can lead to traction alopecia, a condition that causes small bald patches along your scalp.

Many people fear that wearing hair extensions will damage their natural hair, but when used correctly, extensions can be an incredible way to add volume and length to your hair without causing any significant damage. It’s crucial to consult with a trained professional before getting your extensions for the first time, as they will be able to guide you on how to properly care for your new additions.

When it comes to washing your extensions, it’s best to wash them every other day and use a rich deep conditioner to keep them hydrated. It’s also important to avoid over-washing your hair extensions, as this can cause them to deteriorate more quickly. Instead, try to limit your washing routine to every three or four weeks, depending on your lifestyle and how oily your scalp is. By following these simple steps, you can enjoy long, healthy, and gorgeous hair!

Color

Hair extensions are a beautiful way to add length, volume and even color to your look. However, they should not be a rash decision and it’s important to consider all aspects of the process before investing your money.

There are many different methods of hair extensions from clip ins, tape-ins, weave and fusion. They can be made from real human hair or synthetic hair. There are also options for color and texture like ombre or balayage.

The right color is critical to creating a seamless blend. It’s best to choose a shade close to your natural color to ensure it looks undetectable from the start. A good cut will also help the hair blend.

Adding highlights to your extensions can be an easy way to change up the look. However, dyeing your extensions should be done with extreme caution as it can cause damage to the cuticle of the hair strands. This can lead to dryness, tangles and breakage. In addition, it’s generally not a good idea to bleach hair extensions as this can weaken the strands and cause them to shed easily.

If you do decide to dye your extensions, it’s always a good idea to do a patch test first. This will ensure that the hair doesn’t react negatively to the dye and will give you an idea of how they will look after the coloring treatment. It’s also a good idea to only dye your extensions in areas where they won’t be visible as it can impact how they are bonded. For example, you should never bleach fusion hair extensions or lighten keratin bonded extensions as it can cause them to break down and fall out. It’s also recommended to use a demi or semi permanent hair dye when coloring your extensions as it will be more gentle on the cuticles. You should also avoid using ammonia hair dye as this can cause chemical damage to the hair.

Navigation